
The FreeDV project has been active for many years and has produced a suite of digital voice modes for HF radio. Now there is a new and exciting Radio Autoencoder mode RADE. The RADE mode is a real advance. It has a small peak to average power radio. And its digital constellation is not discrete dots but rather a continuous analog pattern. It works great and sounds great!
You can make digital voice QSO's by using the FreeDV-GUI program. It runs in its own window and connects to your
HF radio using the same virtual audio connections used by other digital programs such as WSJT-X.
This paper is meant to make it easier to install and use FreeDV.
The examples are based on my Quisk SDR, but the connections are the same for other SDR software and even classic HF radios.
I hope this guide is generally useful.
Here is a screenshot of FreeDV-GUI.
Go to the release site at https://github.com/drowe67/freedv-gui/releases/. Click the most recent release for Windows at the top of the page, currently v2.0.2. This will go to the release page and the "Assets" at the bottom will show the Windows installer with a name like FreeDV-2.0.2-windows-x86_64.exe. Download and run this file. FreeDV will be installed to C:\Program Files\FreeDVxxxx where the directory name shows the version and date. The FreeDV-GUI program is C:\Program Files\FreeDVxxxx\bin\freedv.exe, and you can create a shortcut to this file.
To update to a newer FreeDV-GUI remove the old version by running the program C:\Program Files\FreeDVxxxx\Uninstall.exe. Then install the new version as before.
The easiest way to build on Linux is to use the build script by Barry Jackson. Complete instructions are in the reference, but here is the cookbook version:
First install "git" using your package manager.
Then change to your home directory.
cd
Clone Barry's git repository.
git clone https://github.com/barjac/freedv-rade-build
Change permissions on the build script.
chmod +x freedv-rade-build/freedv-rade-build
Run the build script. This can take a while.
freedv-rade-build/freedv-rade-build
Enter the root password when prompted to install some system files.
This will install FreeDV in your home directory. The directories are ~/freedv-rade and ~/freedv-rade-build; and the files are ~/freedv-start and ~/.freedv. It will also install a desktop shortcut to FreeDV-RADE (the main program) and Update-RADE (to update the program).
Windows will require a Virtual Audio Cable (VAC) to connect audio between your SDR software and FreeDV-GUI. I use "Virtual Audio Cable" by Muzychenko. The screens below use two VAC's. To create multiple VAC's set the number of VAC's by using the "VAC Control Panel" located at C:\Program Files\Virtual Audio Cable\vcctlpan.exe. If your software supports full duplex, you may be able to use one VAC for both audio paths.
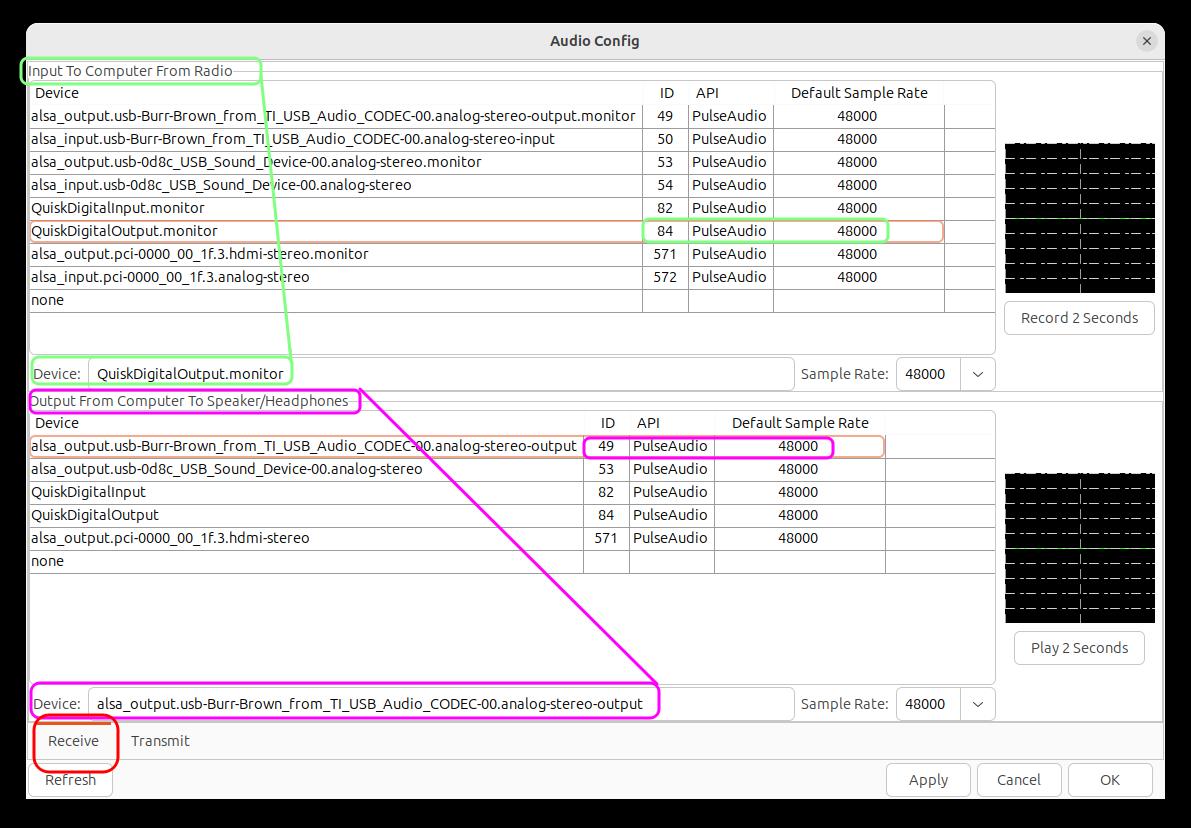
Next start FreeDV and configure the four audio devices and the method of PTT (push to talk). Select the "Tools" menu item, and then "Audio Config...". Select the "Receive" page at the bottom of the screen. To receive digital voice you need to select an audio device to send received audio from your radio or SDR to the FreeDV-GUI program . FreeDV calls this the "Input To Computer From Radio". On Windows this will be a Virtual Audio Cable (VAC) with a name like "Line 1". For Quisk, this is "QuiskDigitalOutput.monitor". In your SDR software, set the the audio device for digital Rx output to the same device. Then specify the audio device for speaker sound, the "Output From Computer To Speaker/Headphones". This will be the name of your speaker sound card in your PC. FreeDV will receive radio sound , decode it and sent it to the speakers.
This screenshot shows the Linux version. The Windows version is the same but the audio devices have different names. On my PC the "Input To Computer From Radio" is "Line 1 (Virtual Audio Cable)". The "Output From Computer To Speaker/Headphones" is "Speakers (2-USB Audio CODEC)".
Now change to the "Transmit" page. To transmit digital voice you need to connect the microphone in your PC to FreeDV. This is called the "Input From Microphone To Computer". It will be another PC sound card. FreeDV will encode the mic into an audio signal to be transmitted. This is called the "Output From Computer To Radio". In Quisk this is QuiskDigitalInput, and on Windows it will be another VAC, perhaps "Line 2". Select "Apply" to record your audio devices. In your SDR software, set the the audio device for digital Tx input to the same device.
This screenshot shows the Linux version. The Windows version is the same but the audio devices have different names. On my PC the "Input From Microphone To Computer" is "Microphone (2-USB Audio CODEC). The "Output From Computer To Radio" is "Line 2 (Virtual Audio Cable)".

Now select the "Tools" menu again, and then "CAT and PTT Config...". The change from Rx to Tx is controlled by the PTT button in FreeDV-GUI. You need to specify how FreeDV controls your radio's PTT button. Note that pushing PTT in your radio has no effect. You must press PTT in FreeDV-GUI. The screenshot shows using Hamlib NET rig control radio 2 and port localhost:4532. You can use a different Hamlib radio number or the control lines on a serial port. See the "Help" menu item "User Manual...".

Note that FreeDV connects to your microphone and speaker sound cards, and so does your SDR software. On Windows you must enable sharing between your SDR and FreeDV. On Windows un-check the "Exclusive" box for both your speakers and microphone.

Start your SDR software and start FreeDV. Be sure your radio is in digital mode, not regular SSB. In Quisk you must select FDV-U or FDV-L. On the FreeDV screen find the "Start" button and press it. The text will change to "Stop" indicating that pressing it again will stop FreeDV. Find the "Analog" button and press it. The text will change to "Digital" indicating that pressing it again will change to Digital. Analog means that audio is passed through FreeDV and not decoded, so you should hear normal radio sound, and you should be able to tune in and hear SSB signals. This is a good test of your receive configuration.
Press the "Digital" button again to change back to Digital (text changes to "Analog"), and FreeDV will now decode radio sound to digital voice. Connect your radio to a dummy load. Right click the PTT button and select "Monitor transmitted audio". Now press PTT and FreeDV should change your radio to transmit and create the digital voice signal. You should see power output. If this fails there is something wrong with CAT configuration. Now speak into the mic. You should hear your voice in the speakers. This is a good test of your transmit configuration. Now right click PTT and unselect "Monitor transmitted audio".
You should now be able to control your radio from FreeDV. Changing the frequency in one changes the other. But I have found it necessary to set FDV-L for lower bands and FDV-U for upper bands manually. FreeDV follows the usual upper/lower sideband convention. And PTT must be set from FreeDV, not the radio.
To really use FreeDV, look at the Help menu and "User Manual". And use the Tools menu and "FreeDV Reporter" to see what stations are active. Record your call sign in Tools "Options" so you appear in FreeDV Reporter too. It is troublesome but possible to fit FreeDV, Quisk and Reporter all on the screen at once by resizing the windows.
The Radio Autoencoder is a significant advance in digital voice. Thank you FreeDV group!
Jim Ahlstrom, N2ADR